

Liquid Chlorine (LCl2)
Background
|
Michael Faraday was a brilliant scientist who made numerous important contributions to the fields of physics and chemistry. One of the many things he is remembered for is being the first person to liquefy chlorine gas. In 1823 Faraday discovered that putting chlorine under pressure and cooling it in an ice bath caused the gas to condense into a yellow liquid.
Pressurizing chlorine requires a pump immune to the highly corrosive nature of the gas. Additionally, putting chlorine gas under pressure creates the risk of springing a leak in, or possibly a catastrophic failure of, the containment vessel, thereby allowing chlorine to escape into the surroundings where other people or equipment may be located. For these and other reasons it is much more desirable to approach the task of liquefying chlorine gas, on the small scale, using an alternative method than that employed by Michael Faraday, one which was not available in 1823.
![]() Warning
Warning
![]()
Chlorine
is toxic and can cause severe respiratory damage and, if
inhaled in sufficient quantities, even death. Take great care
to avoid breathing chlorine gas. In case of inhalation,
retreat to an area with fresh air immediately. Consult
the MSDS, and other reliable sources, to
determine the appropriate medical attention required for
various levels and paths of exposure to dangerous substances.
Chlorine
gas, and liquid chlorine, are highly corrosive and may act as
an oxidizing agent to many organic and metallic materials.
Dry ice and especially liquids cooled using dry ice pose a significant safety risk. Do not allow these substances to touch living tissue (for example, skin) for any significant period of time as they will quickly cool the tissue to dangerously low temperatures and can result in frostbite. Always handle with thermally-insulting, non-absorbent gloves.
A
list of applicable MSDS pages are provided in the 'external
links' section on the left.
Only experienced persons possessing the proper equipment and who are knowledgeable of the material's properties and the recommended safety procedures should attempt this experiment. It is only advisable to perform this experiment inside a well-maintained fume hood or glove box in order to protect oneself from the corrosive and toxic effects of liquid and gaseous chlorine. The danger may be further minimized by only producing chlorine gas, and thus liquid chlorine, in small quantities. Proceed with Extreme Caution and at One's Own risk.
Dry ice (carbon dioxide in the solid phase) sublimes at a temperature of -78.5 °C. One could use dry ice directly to condense chlorine gas, however a more efficient method uses the dry ice to cool a liquid down to the same sublimation temperature, which is then used to cool the chlorine. The chilled liquid possesses the advantage that it will conform to the external shape of the chlorine condenser, giving it a greater contact area over solid chunks of dry ice which will not pack perfectly around a rigid container. The greater contact area between the “hot” (chlorine) and “cold” (ice-bath) reservoirs will allow for faster heat transfer, and thus more efficient cooling and condensation of the chlorine. The trick is choosing a liquid that will not freeze at such a low temperature. For this purpose “denatured alcohol” was chosen to act as the cooling bath fluid to be used in conjunction with dry ice, for reasons explained below.
Denatured alcohol is a somewhat generic term that applies to a mixture of different types of alcohol which is not intended for human consumption (in fact, drinking it may lead to serious illness or death). Generally denatured alcohol contains ethanol as well as additives that make it poisonous, such as methanol and isopropanol, but the precise makeup and proportions can vary between products. Denatured alcohol is a commonly used solvent sold in hardware stores for paining and other purposes. Since the alcohols which are mixed to make up denatured alcohol have very low freezing points (ethanol freezes at about -114 °C, methanol at -97 °C), it will not freeze when dry ice is added. Additionally, denatured alcohol is relatively inert to many materials (plastics, glass) which might be used to contain the cooling-bath as well as the flask used to condense the chlorine, therefore one does not need to worry about the container dissolving as one might with other organic solvents such as acetone or toluene. This property will become important later as a Styrofoam container (desirable for its insulating properties) was chosen to hold the cooling bath and would not have been able to withstand the effects of harsher organic solvents.
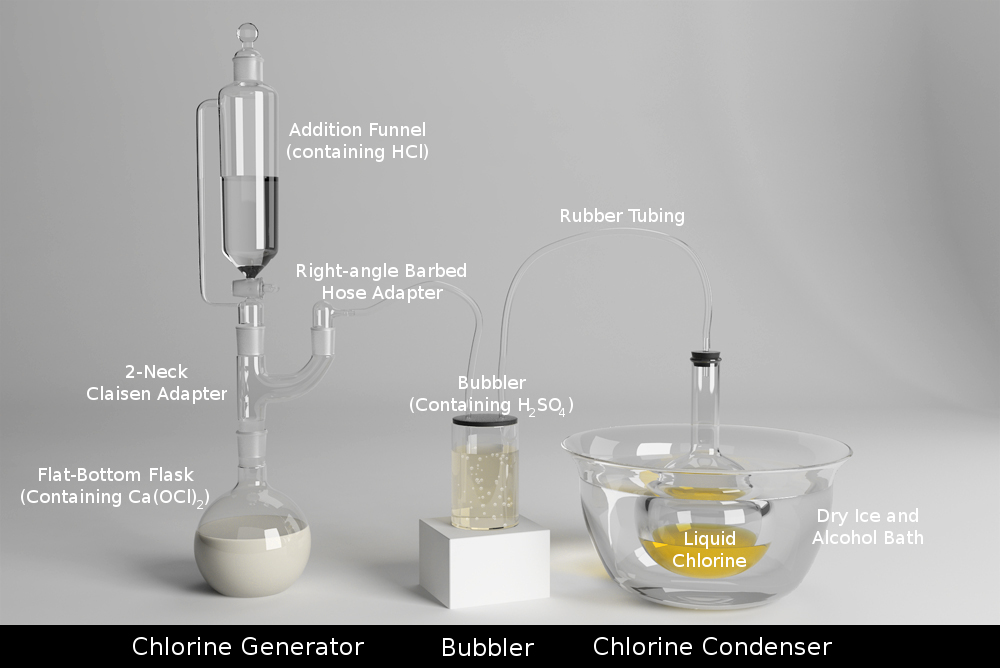
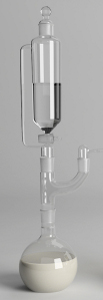
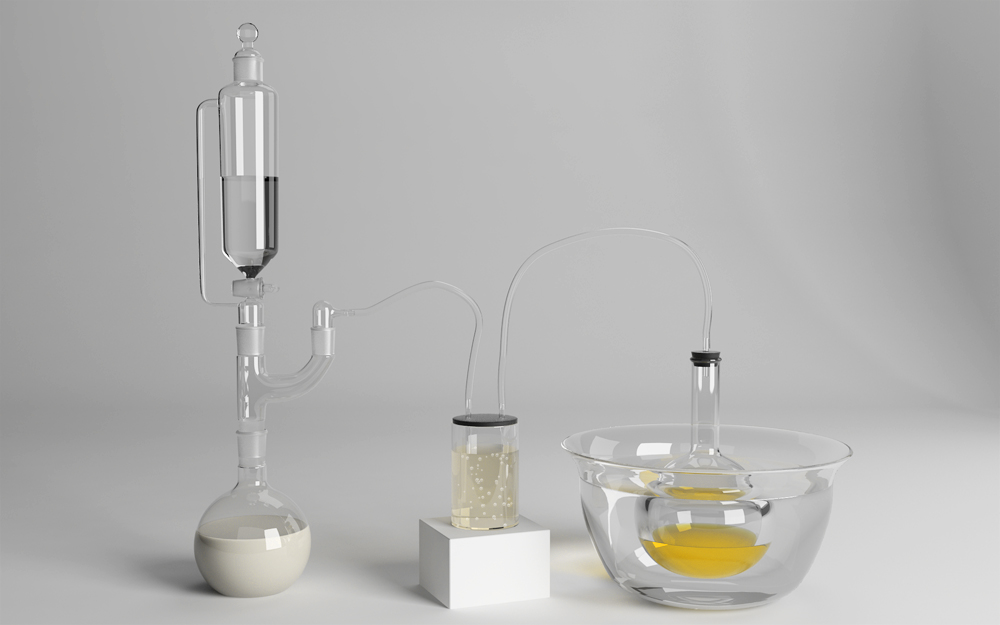
Apparatus Setup
The
apparatus used to generate, dry, and then liquefy, chlorine is
depicted in the diagram below. The complete setup is
divided into 3 stages: the chlorine generator (left), bubbler
(center), and condenser (right). Each of the three
stages are discussed below.
Enlarge Image: With Labels
--- Without
Labels
Note: Ideally, all of the
ground glass joints in the above apparatus should be secured
with Keck
clamps (not
shown) in order to ensure they remain tightly sealed during
operation. As chlorine gas is generated the pressure
inside the flasks will increase. The increase in
pressure may accidentally loosen, or break, the seal between
one or more pieces of glassware, thereby leaking chlorine
into the surroundings and disrupting the proper flow of gas
into the condenser. The clamps hold the joints
securely in place and prevent this occurrence.
Chlorine
Generator
 A flat
bottom flask containing solid granules of calcium hypochlorite
(Ca(OCl)2) was attached, via a 3-neck Claisen
adapter (only 2 necks are depicted in the diagram since the 3rd
neck is unused), to an addition funnel containing hydrochloric
acid (HCl) and to a barbed hose adapter. This assembly
is identical to that shown here, where the
addition funnel extends up beyond the top of the image (Note:
this image is taken from another
project, but the arrangement is the same as that used
here). Once properly assembled, this arrangement allows
for the controlled addition of hydrochloric acid to the flask
containing Ca(OCl)2. When mixed, HCl and
Ca(OCl)2 react to produce chlorine gas, as
described by the chemical equation shown below. Since
the container is completely sealed except for the opening in
the barbed hose adapter, the chlorine is directed out of the
flask and through the connected tubing. Such a setup is
advantageous when generating chlorine gas since the reaction
is completely contained inside the glassware and the operator
is never directly exposed to the chlorine or its precursor
chemicals.
A flat
bottom flask containing solid granules of calcium hypochlorite
(Ca(OCl)2) was attached, via a 3-neck Claisen
adapter (only 2 necks are depicted in the diagram since the 3rd
neck is unused), to an addition funnel containing hydrochloric
acid (HCl) and to a barbed hose adapter. This assembly
is identical to that shown here, where the
addition funnel extends up beyond the top of the image (Note:
this image is taken from another
project, but the arrangement is the same as that used
here). Once properly assembled, this arrangement allows
for the controlled addition of hydrochloric acid to the flask
containing Ca(OCl)2. When mixed, HCl and
Ca(OCl)2 react to produce chlorine gas, as
described by the chemical equation shown below. Since
the container is completely sealed except for the opening in
the barbed hose adapter, the chlorine is directed out of the
flask and through the connected tubing. Such a setup is
advantageous when generating chlorine gas since the reaction
is completely contained inside the glassware and the operator
is never directly exposed to the chlorine or its precursor
chemicals.
![]()
Alternative methods exist to generate chlorine gas and one will find a more detailed discussion on this topic in the related article, “Chlorine Gas Production”. For the purposes of liquefying chlorine, the precise method and apparatus used to generate the gas do not matter a great deal, the above method is only one suggestion. Any chlorine gas source may be used in place of the generating apparatus depicted on the left side of the above sketch whose output is then fed into the next stage (the bubbler).
Bubbler
 Water vapor is mixed in with the chlorine
during production since the gas is generated in a very
water-rich environment (hydrochloric acid contains a great
deal of water, in addition to the water that is formed
alongside chlorine in the chemical reaction). Thus, the
as-produced chlorine gas is considered “wet”. It is
desirable to “dry” the gas prior to liquefying since this
increases the purity of the final product as well as makes the
liquid chlorine less corrosive to many materials.
Water vapor is mixed in with the chlorine
during production since the gas is generated in a very
water-rich environment (hydrochloric acid contains a great
deal of water, in addition to the water that is formed
alongside chlorine in the chemical reaction). Thus, the
as-produced chlorine gas is considered “wet”. It is
desirable to “dry” the gas prior to liquefying since this
increases the purity of the final product as well as makes the
liquid chlorine less corrosive to many materials.
In order to remove this water, the chlorine gas is directed
into a sulfuric acid bubbler following production.
Concentrated sulfuric acid is a powerful desiccant and readily
absorbs water from its surroundings. As the chlorine is
bubbled through the acid, water vapor is removed from the gas
and the chlorine which exits the bubbler is left very dry (i.e
it contains very little moisture). One could also use an
alternative dessicate, such as calcium chloride packed inside
a long sealed tube through which the chlorine gas is
passed. Once the chlorine is dry it is then ready for
condensation into a liquid.
In
the diagram, chlorine gas is fed into the bubbler through the
lid and down a tube to the bottom of the container. Upon
exiting the tube, the chlorine gas bubbles up to the top of
the liquid, in the process contacting the sulfuric acid and
loosing some of the water vapor mixed in with the gas. The dry
chlorine gas accumulates at the top of the bubbler and exists
through a tube connected to the outlet. The dehydration
process is fastest when the contacting surface area between
the wet gas and the dehydrating agent is maximized, thus
smaller bubbles are more efficient at drying the gas due to
the larger surface area to volume ratio.
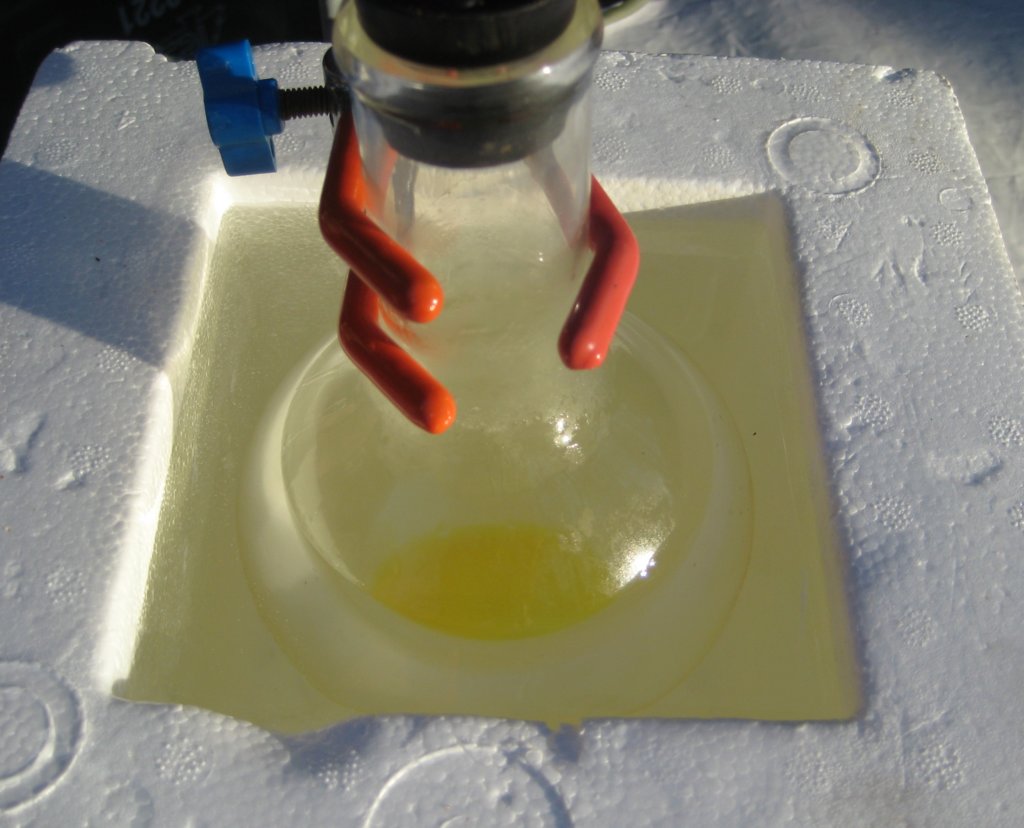
Chlorine Condenser
 A
borosilicate glass (Pyrex) flat bottom flask was used as a
condenser in this experiment. The Pyrex flask was chosen since
it is chemically inert, can withstand the thermal shocks
involved in condensing chlorine, and allows for high thermal
contact areas between the chlorine and cooling bath.
A
borosilicate glass (Pyrex) flat bottom flask was used as a
condenser in this experiment. The Pyrex flask was chosen since
it is chemically inert, can withstand the thermal shocks
involved in condensing chlorine, and allows for high thermal
contact areas between the chlorine and cooling bath.
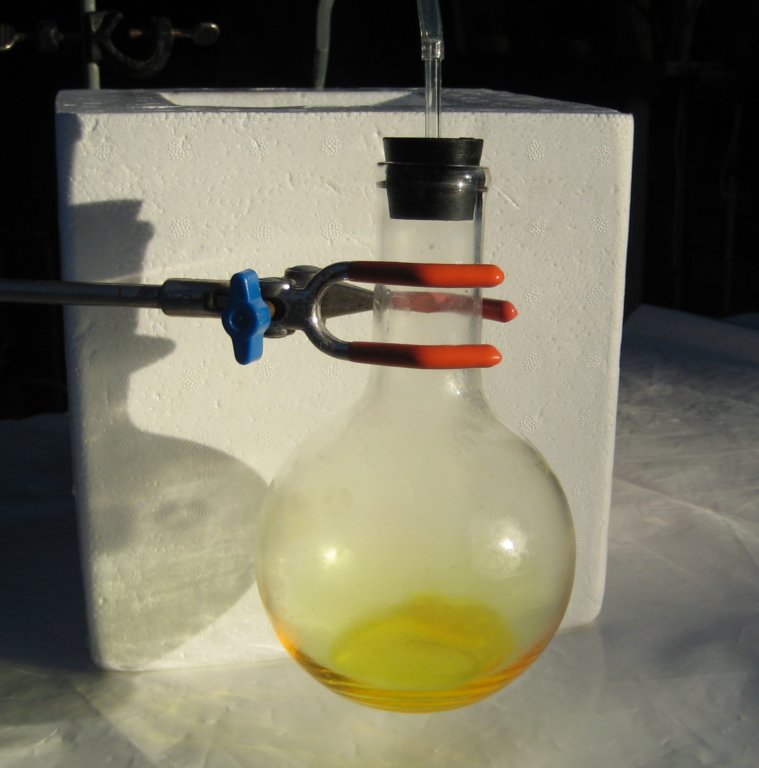
The flask was immersed in a dry ice and alcohol bath in order
to keep its wall's chilled to a temperature of approximately
-78 °C throughout the course of the experiment. Dried
chlorine gas was directed into the flask though a
loose-fitting rubber stopper with a single hole drilled in its
center, through which a chlorine-carrying tube was
inserted. Chlorine gas which enters the flask condenses
on its walls and accumulates at the bottom of the flask where
the temperature is maintained at -78 °C by the surrounding dry
ice and alcohol bath. If the rate at which chlorine gas
enters the flask exceeds the rate of condensation, the
pressure inside the flask will rise and push open the
loose-fitting stopper, venting the flask in a controlled
manner and avoiding undesired pressure buildup.
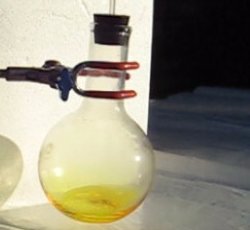
The liquid chlorine which condenses is cooled to the temperature of the dry ice bath, which is well below chlorine's boiling point. At this temperature, though, chlorine still has a vapor pressure of approximately 15 kPa (about 15% of standard atmospheric pressure). As a comparison, ordinary pure water has a vapor pressure of 15 kPa at a temperature of about 54 °C (130 °F). Like hot water, liquid chlorine will evaporate as some of its molecules will transition into the gas phase (even though it is below its boiling point). Just because the chlorine is a cold liquid does not mean that there is no chlorine gas around, thus one should continue take care not to inhale the fumes.
A Styrofoam container was used to contain the dry ice and alcohol cooling-bath which surrounded the chlorine condenser. Styrofoam is an excellent thermal insulator which reduced the flow of heat into the cooling bath and helped maintain its low temperature longer (reduce the amount of dry ice needed to keep the liquid cold for long periods of time).
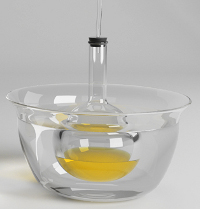
Pictures
of the actual chlorine condensing setup may be seen below.
 |
 |
 |
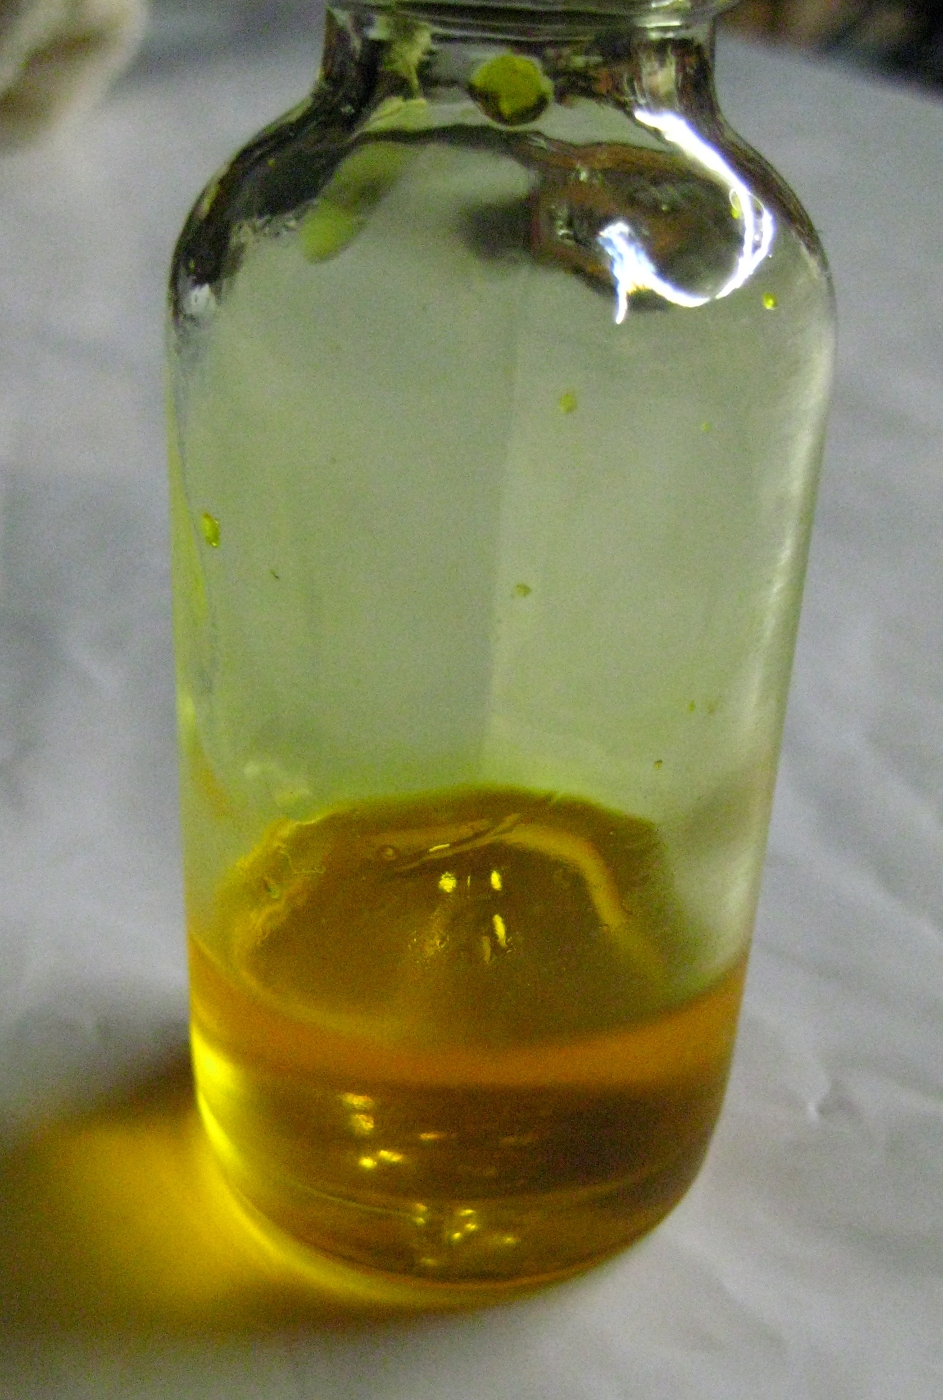
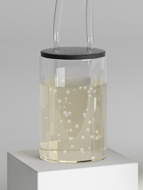
Below, one may see pictures of a small amount of liquid chlorine contained within a glass vial.
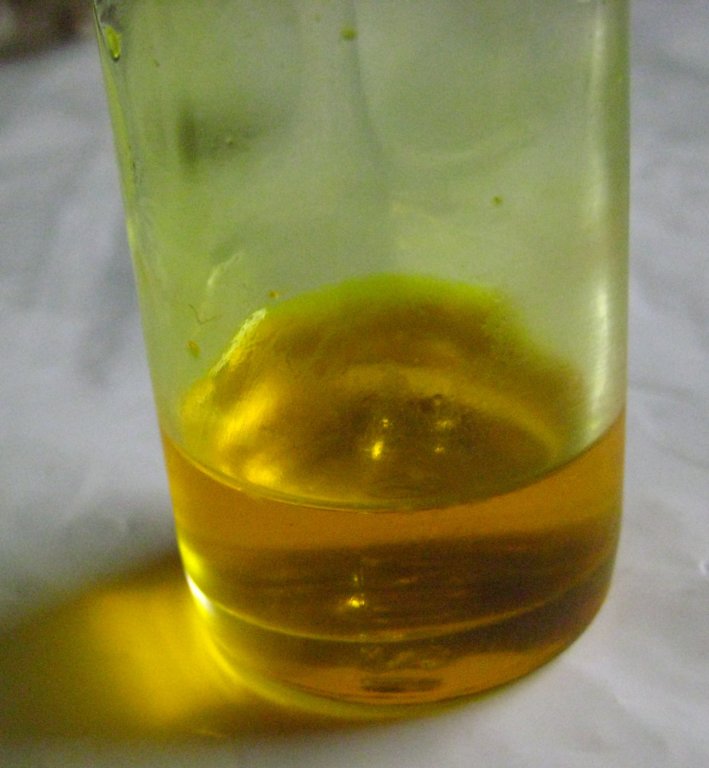 |
 |
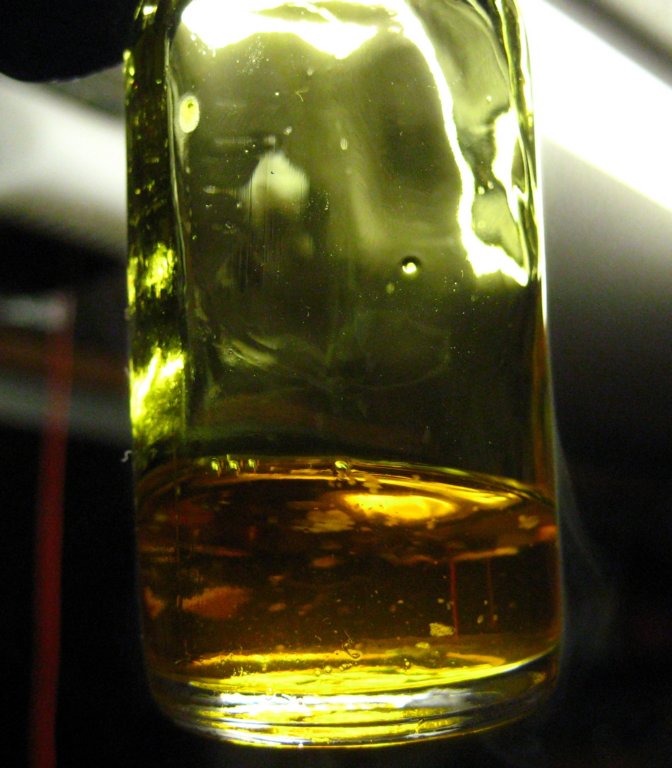 |
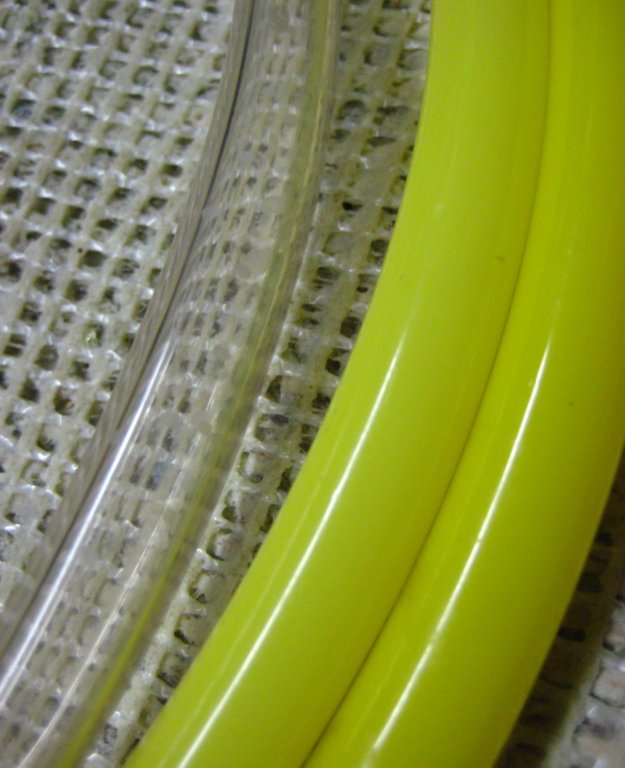
It is interesting to note the effect on the polyvinyl plastic tubing used in this experiment due to the many hours of constant exposure to chlorine gas. The tubing shown below was initially perfectly clear, as can be seen in comparison with a used hose in the second photograph. After many hours of chlorine exposure, the hose turned a bright, opaque, yellow color on its inside surface.
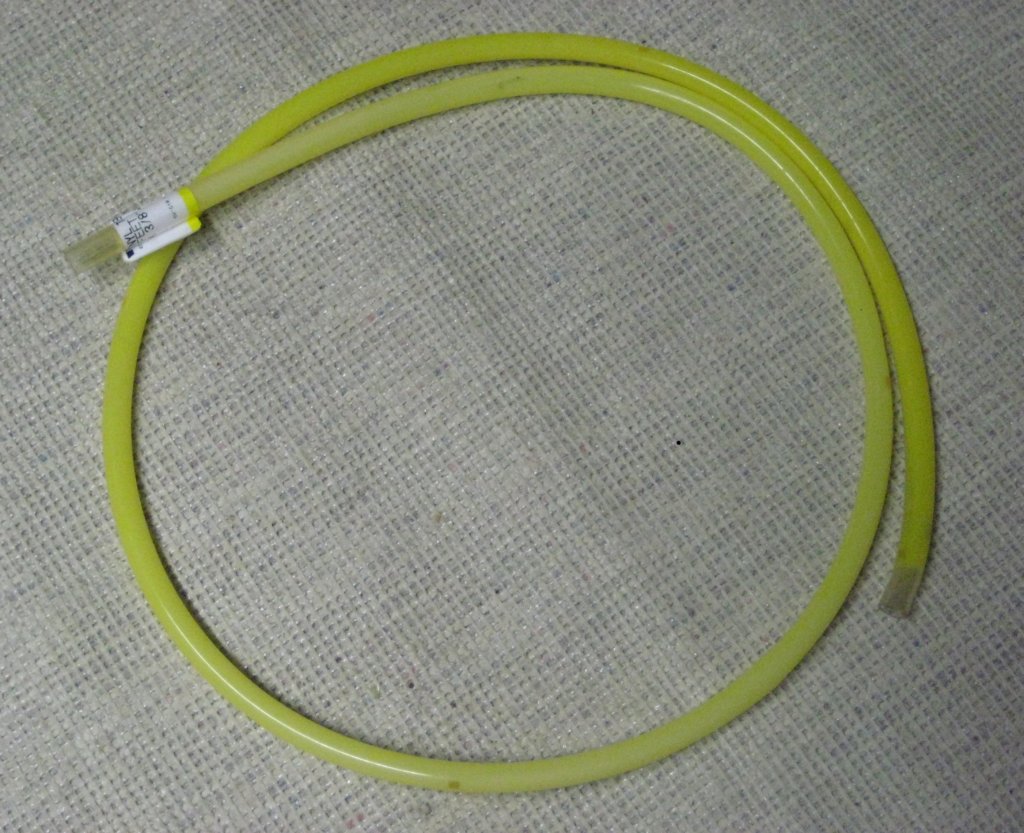 |
 |
Liquid Chlorine Videos
In the below video one can see as the chlorine condenser is removed from the cooling-bath and shaken, causing the yellow-colored liquid chlorine contained within the flask the move and swirl.
|
Video
|
|---|
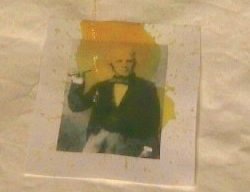
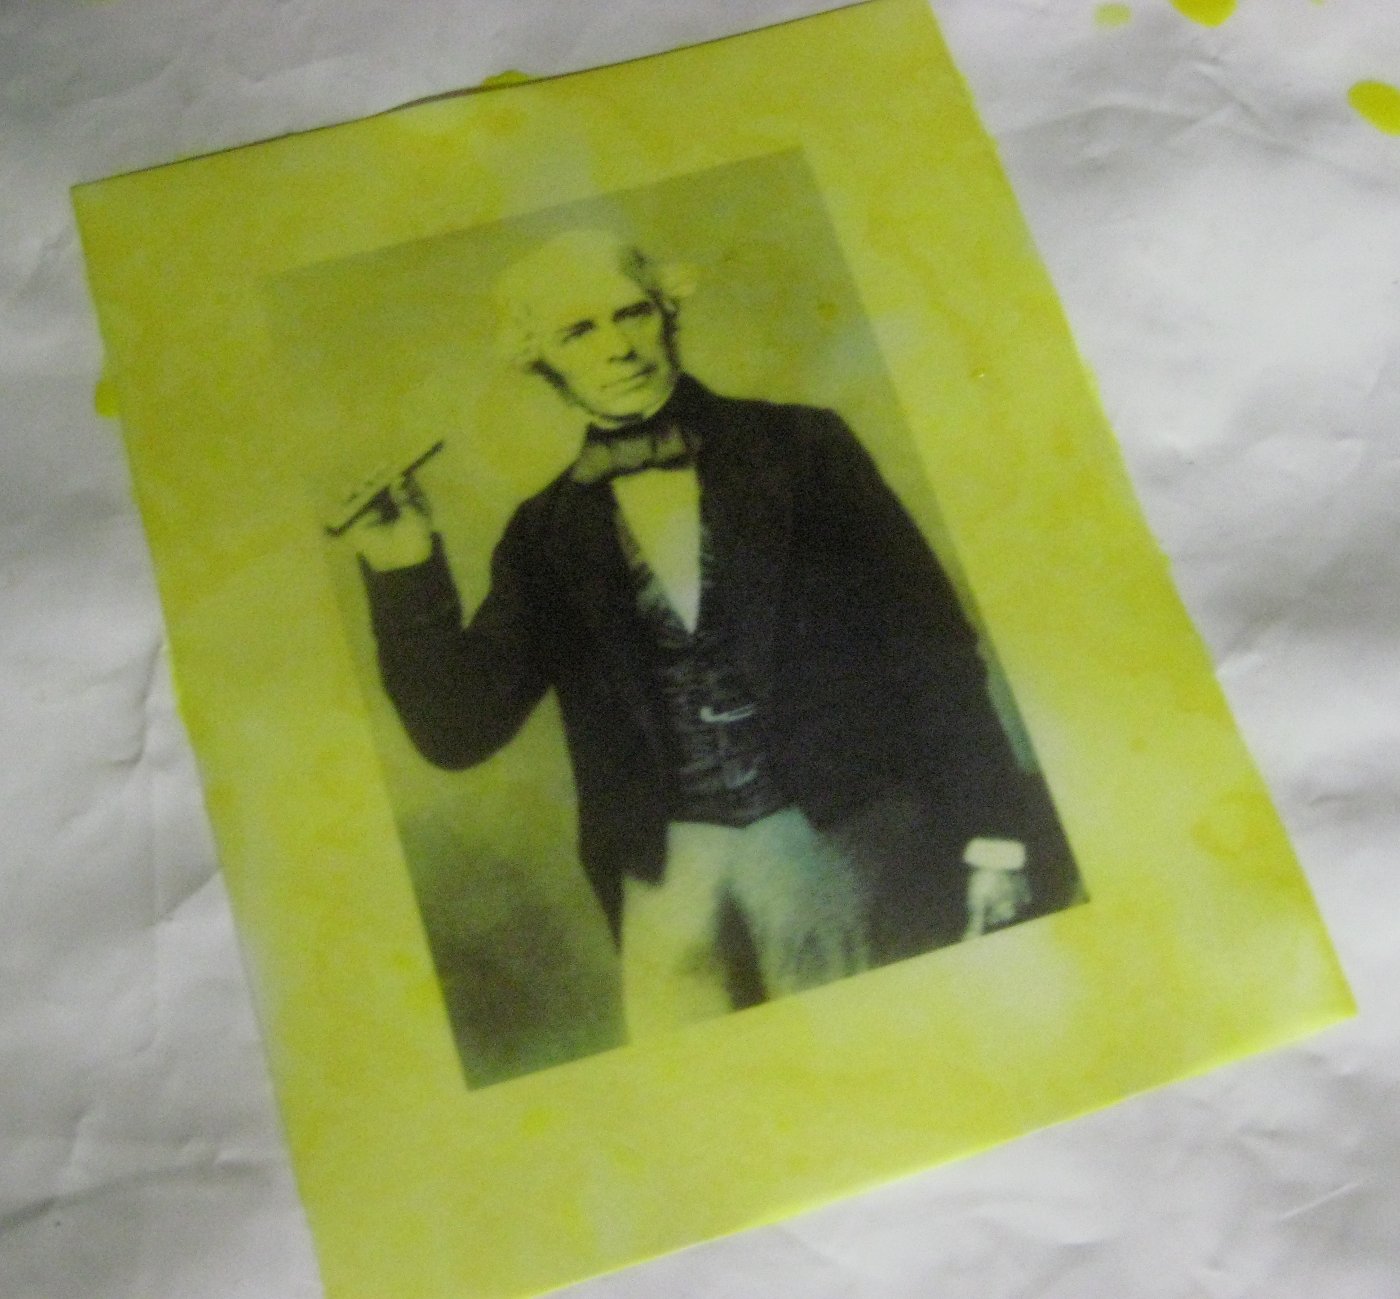 Chlorine can act as an
oxidizing agent on many organic materials. As a means to test
the oxidizing power of liquid chlorine, small amounts of the
liquefied element were poured onto items of interest such as a
piece of dyed fabric and (as shown below) a piece of paper
with a picture printed on it. As mentioned above, Michael
Faraday was the first person to liquefy chlorine. For this
reason, and out of great respect for his achievements, an
ink-jet printed portrait of Michael Faraday was chosen to test
the oxidizing effects on liquid chlorine. Only dry (containing
little to no water) liquid chlorine was used for these tests.
Chlorine can act as an
oxidizing agent on many organic materials. As a means to test
the oxidizing power of liquid chlorine, small amounts of the
liquefied element were poured onto items of interest such as a
piece of dyed fabric and (as shown below) a piece of paper
with a picture printed on it. As mentioned above, Michael
Faraday was the first person to liquefy chlorine. For this
reason, and out of great respect for his achievements, an
ink-jet printed portrait of Michael Faraday was chosen to test
the oxidizing effects on liquid chlorine. Only dry (containing
little to no water) liquid chlorine was used for these tests.
|
Video
|
|---|
As the liquid chlorine is poured out onto the paper nothing particularly spectacular is observed to occur; the liquid simplyflows to cover and soak into the fibers of the paper. Afterward, the chlorine is allowed to warm up and eventually boil away over the course of several minutes. Once the paper was dry, and all the chlorine vaporized, the paper was compared with an identical copy that had not been soaked in liquid chlorine, as seen below.
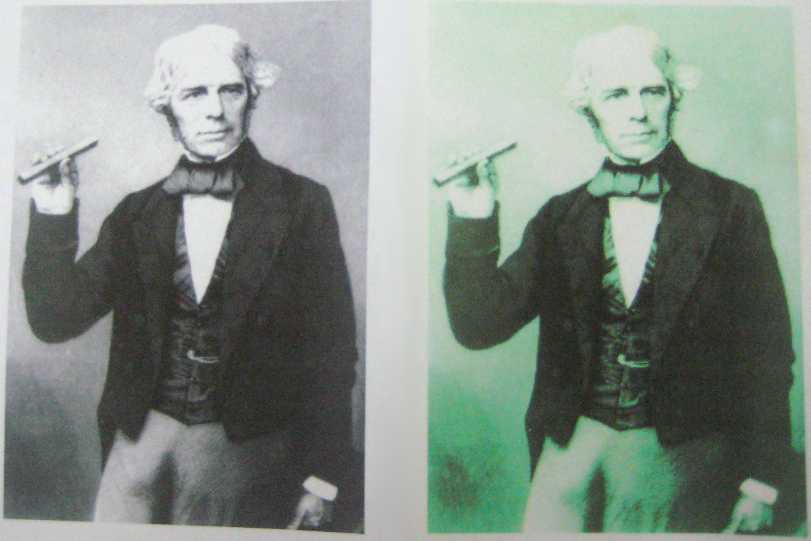
Above: original,
un-soaked, picture (left), chlorine-soaked picture (right)
Notice the difference in color between the original and liquid chlorine-soaked pictures. The chlorine-soaked picture (right) has a green tint, which would seem to indicate selective oxidization / bleaching of the ink used to print the image.
Last updated:
03/29/2010